KLX250S Service

johnnysneds

Senior Member
Joined
May 14, 2011
Location
Chiang Mai
Bikes
Multistrada 1200S Touring, WR450F, KTM200EXC, Gas Gas 280, PCX
Hasn't had much attention lately so thought I would service the old KLX.

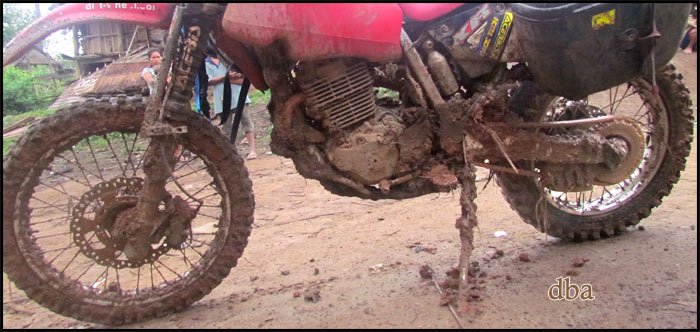
Before: not too much different looking until you start stripping her down.
web.jpg


web.jpg


web.jpg


web.jpg


web.jpg


web.jpg


web.jpg


web.jpg


web.jpg


Swing arm was removed and all joints removed, cleaned and lubed.
web.jpg


web.jpg


Corrosion at lower roller bearings from sitting water that breached the seals
web.jpg


web.jpg


web.jpg


web.jpg


Thoroughly cleaned from old grease and re-lubed.
web.jpg


web.jpg


web.jpg


web.jpg


Re-assembled and ready to be installed.
web.jpg


web.jpg


web.jpg


web.jpg


web.jpg


web.jpg


I use a bucket of warm soapy (washing up liquid) water and a sponge to clean my chain. Leave it in the sun until dry and lube with Motul Offroad Chain Lube. Good stuff you can see it penetrating the o-rings as you spray it on.
685240000_Motul_Chain_Lube_Off_Road.jpg


web.jpg


web.jpg


A happy, clean and lubed rear end. Onto the front....
web.jpg


web.jpg


web.jpg


Still plenty of grease apparent from the last time I lubed the steering stem up 3,000 Km ago.
web.jpg


web.jpg


Remove all the old grease and put plenty of new stuff on.
web.jpg


web.jpg


Bearing installed with dust cover.
web.jpg


Lower bearing also still plenty grease apparent from last service, nice.
web.jpg


Cleaned and re-greased
web.jpg


Forks re-assembled and all electrics cleaned with WD40.
web.jpg


web.jpg


web.jpg


Front wheel bearing maintenance. Required plenty of cleaning and re-greasing.
web.jpg


web.jpg


web.jpg


web.jpg


web.jpg


Rear rack has been modified to mount a Kolpin 1.5 gal fuel tank, really handy and easy to get on and off. I have two of these and one is used for water. More info can be found here: http://www.kolpinpowersports.com/products/water-and-fuel-packs/fuel-pack-jr-with-pack-mount.html

web.jpg


web.jpg


web.jpg


web.jpg


Also the engine oil was replaced with Motul, oil filter replaced, new spark plug (correct gap set) and the No-Toil two stage filter was thoroughly cleaned and re-sprayed with Motul Air filter oil.
motul_air_filter_spray.jpg


Nice and easy to work on the KLX
And here she is all ready to go for some more adventure....

web.jpg


web.jpg


web.jpg


web.jpg


web.jpg


web.jpg


web.jpg
 
The mods I've done to my KLX go something like this:

First thing I did was de-restrict. Re-routed the wire to the ECU which allows the engine to rev to it's limiter in all gears. Most people this is the first thing they do.
I also bought an aftermarket Thai exhaust slip-on but this fell apart several times. On it's final farewell it completely departed the motorcycle and narrowly missed a friends head in Cambodia, oops sorry F. Now there is exhausts kicking about the Kawasaki shops etc but what a price there asking form them. All I did was get a hold of a second hand FMF slip-on took it along with the bike to one of these exhaust places and got them to make a pipe up for it that will mate with the stock header. I was chatting with Ian Bungy about a power bomb header pipe that can be manufactured locally. What these do is exhaust gases passing through the power bomb expand, cool and accelerate increasing flow. He swears it makes a big difference so I will give it a go soon. Moreover this power bomb will act like a pre muffler and hopefully quieten my booming exhaust down a bit.
Now I also have a contraption fitted to my bike called a Memjet Module. It's fitted inline with the air intake signal. It has a manually operated dial of infinite settings which will intercept the signal from the ECU to the butterfly, amplify it to increase the amount it opens. The ECU should sense the increased intake of air and alter the ignition/fueling to suite. This also will give you a wee bit extra power. Too much though and it starts coughing and farting as the mixture becomes too lean. It will drop your mpg quite significantly also.
You can remove your snorkel on the top of your air box to increase flow, however I put mines back on as any dirt/water gets in easily. Not worth the insignificant increase in performance in my opinion.
Now depending on what you use your KLX for this next mod will produce the biggest single noticeable change out of all of them, without going for a big bore kit that is. If you mostly ride on the road I would just leave the gearing as is, however if you spend most of your time off-road and not worried about top speed, change your sprockets. I need to check but I think I went one down on the front and a 48T on the rear. Now you'll probably think the mods previous to this made a difference, combine them with the sprocket change and you won't believe the difference. I run my rear tyre pressure around 18psi and have ripped off two stems. Yes I need to fit a tyre lock, the point is it didn't do it before the gearing change. I want to try a 50 or 52 tooth rear sprocket to see if the front end can come up any easier when riding holes/bumps on tricky trails. This is an area which let's the KLX down for me, but it's not a biggy. I thought it might just be my limited ability but no, I rode some trails on my WR last week and this does it no problem, fantastic, but that's another thread.
I believe you can now buy Power Commanders for them and I'm sure it will smooth out the fuelling, however I think the fuelling is pretty good from the injection system as it is.
Not long ago I was looking into a 350cc big bore kit. It would be a very interesting project and one I still want to have a go at, however my priorities have change for the time being but I'm sure I'll get around to it again at some point. I think there's a thread on here somewhere and a chap from Indonesia has successfully done it with great results, it did however cost him over $3000. Cheaper options will become available as the more people figure it out.
I've personally been very happy with the mods ive done to my KLX. It's kept a smile on my face over the years and still does.
 
Firstly remove your rear rack if you have one. Then your seat and the left hand side panel.
web.jpg


It should then look like this.
web.jpg


Disconnect the negative terminal of your battery and then the positive and ensure the cables are clear from the posts.
web.jpg


This is your ECU
web.jpg


Gently pull it off the upper and lower securing brackets.
web.jpg


Depress the connector with your thumb as shown, you'll hear a click. With your other hand disconnect the loom/connector from the ECU and store the ECU somewhere safe.
web.jpg


web.jpg


At the lower part of the connector at the rear you will see a light green wire. Snip this wire approx. the same length as in the photo.
web.jpg


The yellow wire you see is additional. Get a piece of say 24" long, this is more than enough and the excess can be snipped of later. I put some plastic sheathing over it to give some extra protection. Prepare both ends and tin them ready for soldering as shown.
web.jpg


Put a piece of heat-shrink over the longest end before you solder both ends together. Solder the ends and slip the heat shrink over the joint as shown.
web.jpg


After finishing off the heat-shrink/joint with a heat gun it should look like this.
web.jpg


The other snipped end of the light green wire ensure you put a piece of heat-shrink over the end and isolate it with a heat-gun as shown.
web.jpg


Your now finished with all the fiddly stuff here and hopefully it should look something like this, or better.
web.jpg


Leave the ECU out of harms way until the other end is complete.


Where your bum is roughly parked when riding you will see three connectors, the one of interest to us is the one in the middle.
web.jpg


To make life slightly easier remove the two rubber connectors just forward of these three connectors. You'll have more access.
web.jpg


Ok back to the connector. First you remove the connector by using a small screwdriver, press gently down on the clip as shown.
web.jpg


Pull the connector free with your other hand. Note: the black and clear sections of the connector remain connected.
web.jpg


Pull the female end of the connector free from the bracket as shown. This is the end we will be working on.
web.jpg


At the rear of this connector locate the black wire with a red stripe. Be careful there are two black wires, one has a brown stripe. The one you want is at the corner of the connector as shown. Snip this wire as shown in the photo.
web.jpg


web.jpg


Remove the black/red wire with crimp from the connector. Use a small watch makers driver from the front to release the crimp. (ignore the terminal block connected to the wire)
web.jpg


Now it makes things a little easier if you solder a short piece of wire onto the piece you just removed to give you a little bit more free play to work with.
web.jpg


Put a piece of heat-shrink over the joint and heat gun it into place. Tin the free end ready for soldering.
web.jpg


The yellow wire from the ECU you have to route this up to the connector you just removed, you should have plenty extra. Snip the yellow wire (or whatever colour of wire you are using) so that it matches with the other end of the black/red wire you snipped earlier. Twist these two together and tin them ready for soldering.
web.jpg


The crimp connector that you added the small extension too, solder this to the black/red and yellow wires that you just soldered together. You will now have a "Y" connector like shown in the photo.
web.jpg


Slip a piece of heat-shrink over the "Y" splice and use a heat gun.
web.jpg


You should end up with something like this.
web.jpg


Insert the crimp back into the connector until you hear it clicking into place.
web.jpg


Slide the connector back into its bracket.
web.jpg


Connect the other end until you here it clicking into place.
web.jpg


web.jpg


Put the lower two rubber connectors back onto their posts and your finished up here and it should look like this.
web.jpg


Get your ECU. While its off give the connector a good check for dirt and corrosion and clean as necessary.
web.jpg


Mate the ECU and connector fully back together carefully. And slip the ECU back onto its upper and lower brackets. If you've any excess wiring tidy it up by using a cable tie around the sub-frame as shown.

web.jpg


Connect the your battery. Fit your L/H panel and seat.
web.jpg


Your bike is now de-restricted.
web.jpg
 
Clean workshop and all the tools, jealous, to the max!

Extremely well put together presentation, Not sure how you keep it all so clean?

What camera are you using ?
 

Attachments

  • mudbike.jpg
    mudbike.jpg
    73.8 KB · Views: 807
No workshop I'm afraid just a small driveway and you could probably throw some tools together from between 10-15K baht and have the same as I have.

The cleanliness more than likely comes from my days of working on aircraft. Everything has to be so precise and organized, baaah!!!

I use a Canon 5D MkII. Don't ask me how to use it though, I just leave it on full auto and press the button. Have strayed a few times from auto and the results have always been below par.
 
Don- this shot must be from the settlement after we got stuck as i can see your rear sprocket looks like a potters wheel.


Midnitemapper said:
Clean workshop and all the tools, jealous, to the max!

Extremely well put together presentation, Not sure how you keep it all so clean?

What camera are you using ?
 
Hi John

Just did the wire snipping last night. Thanks for the excellent post with the pictures. Worked easy and I am really happy with the result. Haven't checked the top speed yet but a quick test showed already a great increase in power.
Did uphill faster than on most flat roads before.
 
Back
Top Bottom